Thursday, 26 February 2009

Busy busy busy!!

Can you believe it's nearly the end of February?! Where is the time going...

Don't forget for every order you place of £45 with me before 5pm on Saturday the 28th of Feb you get a free special edition stamp set plus free p&p!
(P&p offer is run by me and not Stampin' Up!)

The catalogue can be found down the side of the page that way -------->
Feel free to have nose!

So, this week I've been making cards, cards and more cards!

I've posted some pictures just to show you how fab the Stampin' Up! products are if you're not already addicted to them!

This one is using the 'Crazy for cupcakes' set.


This one is using an level 3 hostess set and repeating the image in a line using the trusty stamp-a-ma-jig which works every time and then I've isolated the message from a stamp in the 'Fun & Fast notes' set.


The background on this card is using the 'Petals' Stampin' Around jumbo wheel and the flower is from 'Botanical blooms' which is one of the limited edition sets *see start of post to find out how to get it free*


Again on this one I've used an image from 'Crazy for cupcakes' and then the band along the middle was stamped in versamark , coated with the heat and stick powder and topped off with dazzling diamonds ~ note to self ~ do this more often!


I've used the 'Cheers to you' image and message on here and again used the dazzling diamonds to accent the drink.


I love this little dotty flower stamp from 'Simply said' and the red accents on the left hand side are flowers using the 'Three for you' flower punch and just adhered to the edge.


And finally this is a card I made for my {uber trendy} cousin in London - 31 !!

Image is Stamping Bella and papers, ribbon and message are Stampin' Up!

I've isolated the message again from 'Fun & Fast notes' and used the stamp-a-ma-jig to make sure it was stamped exactly where I wanted it.


I also used my stampin' write markers with the blender pens to colour and they are sooo fab!
They make my heart *glow* ha!

Hope you like them!

Thanks for stopping by,
take care
xx

Saturday, 21 February 2009

A quick update.

Hi everyone,
just stopping by to say a big thank you to Carolynne who has given me an award which I am so grateful for!


How nice is it to know people enjoy reading my little blurbs :)

Check out Carolynne's blog here.

My 7 nominations are:

Rozzy
Paula
Clair & Sharni
Sally
Sharon
Donna
Mel

Great blogs with lots of inspiration for you!

Below is a card I made for Stu as it's our 6 year anniversary on 21.02.09.
We've been together since we were 16 and he really is my best friend (Aww lol)

For this I used SU!'s stamp set 'Simply Said' for the heart, 'Wonderful Words' for the love at the bottom (I adore this stamp it is so fab!) and the stamp on the envelope is from 'Sealed with a kiss'

Hope you like it!


And a card for my little sis who turns 18 on the 12th of march.

(Happy Birthday Sammi - Stop borrowing my clothes without asking !)

The Girl stamp is from Stamping Bella.
I used SU!'s Dazzling Diamonds to sparkle her belt and drink and I used the Whimsy stamping around jumbo wheel for the background.
I'm addicted to my wheels *Heart*


Thanks for stopping by,
take care x

Saturday, 14 February 2009

As promised...


...the ribbon rose tutorial!

I apologise in advance for some of the angles - I had to rope Stu into being cameraman!

Anyhoo, I know it's too late for Valentines day but they can be used on Anniversary cards, Wedding cards (How cute would it be to do a white rose!) and you can even make a few and put them on 'sticks' to make a bunch of flowers. The possibilities are endless...
Would love to see yours, if you have a go please leave a comment with a link for us all to see!

So here goes...


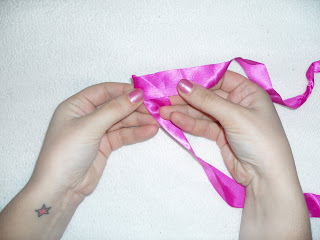
Start off with a length of ribbon (Mine is approx. 15 inches)


Then you need to make a right angle in the ribbon by folding it over itself.

Then take the left hand part of the ribbon and fold it over the right angle you just made.

Next, using the length from the bottom fold upwards at a right angle.

Repeat until you get a nice thickness (1 inch is good)


So your left with this. (Like when you used to make 'springs' in school)

Keeping hold of the ends, let the folds go.

Then, with both ends between your thumb and forefinger pull one end.
You need to apply a little pressure with your thumb to make sure it pulls straight.

Pull all the way until the folds joins at the top.

(You can use a peg or clip at this stage to hold the ends together)

Once the folds are all joined, you can start to work with them to make 'petals' and manoeuvre them into shape.

Your left with a lovely, very simple ribbon rose!

When I'm happy with the finished look I just very roughly tack it with a few stitches.
(And I mean roughly, I'm rubbish with a needle and thread!)

All you need to do then is conceal the ends in your project and your all done
:o)


Here's one I used on a card. It adds great dimension with very little effort!


Why not try experimenting with different types and widths of ribbon?


And the thing I love most about these little roses is that if you make a mistake or don't like the end result you can just let go and start all over again!
*Magic*

I hope that has got you wanting to try one, they really are so so easy and you can use up bits of ribbon you've got left over by making small ones.

Thank you for stopping by.
Take care
x

Sunday, 8 February 2009

Where does the time go??

It seems that every week just flashes by !

So the UK has been hit by the snow and we've had it up here as well.
It looked so pretty when I got in from work at 1am that I just had to 'christen' it and let the dog out in the front for 10 minutes.
He loved it! *Brrr*


And back to crafting...

I've put in my first [extra] large order with Stampin' Up! and cannot wait for my stash to arrive!
*Stalking Mr DHL on a daily basis*

A little heads up : Keep checking back for blog candy coming very soon!!

So in the mean time I've been making little gifts for friends to make room for my new goodies.

This one is just a little treat bag using the Stampin Up! clear cello bags.
I tried a new technique for the bow.

I punched two small rectangles about 1/4" apart and taking a small length of ribbon fed the ends of the ribbon through the rectangles from the front to the back. Then with the ends at the back thread them back through the rectangle on the opposite side and out to the front. This will result in the bow being flat and neat.
(Hope that all made sense!)


This weekend I made a trip to the Stitch and Creative Crafts exhibition at Manchester Central (Formerly the G-Mex Centre)

I love going to these shows, they have one there every 6 months.
I saw this card on one of the stands and I fell in love with this stamp.
It's by Penny Black and called 'Flying Stars'
Seeing this sample at the table made me NEED IT! Haha.


So here's my take on it...


And now Valentines day is fast approaching I made a few gifts.

And I couldn't forget Paddy!
He's already sniffing the draw where I've hidden it...


And one for Stu, I decided the steer away from the traditional red and just love the blue with the chocolate. What do you think?


And finally (I promise !)

A little card using Stampin' Up!'s love notes.


The rose at the bottom was inspired by Wendie Rhodes.
At the show she demonstrated how to make flowers out of ribbon. It is so so easy!
If I get a chance I will try and do a tutorial on this sometime.
It really is a great little accent.


So, I think I've rambled off enough for this week!
Hope you like my creations, please leave a comment. It really does make my day when I get them!

Thanks for stopping by, take care
x