Tuesday 27 July 2010

Butterflies

Oops, has it been a week already??

Sorry about that!

Tonight I had my Flight of the Butterfly class and we had such a laugh, I need to thank Linda in my downline for coming along and the lovely ladies who attend my classes each month. They really are a great bunch :)

We made 6 cards and a matching desk organiser, I adapted the measurements slightly from a tutorial Jo D did here to fit into some clear plastic boxes.


I can't wait for our next one, I will share details about that one soon.
If your in the Merseyside area and fancy a fun night of craft and chat them e-mail or call me to book your place.

Stu is taking me to London for the weekend for my birthday and we have booked tickets for go see Wicked so I will be back next week with some pictures to share!!

Thanks for stopping by,
take care.
x

Wednesday 21 July 2010

Lottery Ticket Holder Tutorial

Morning everyone,

Here is the lottery ticket holder tutorial as promised.

I've not included any measurements as they can vary depending on the type of ticket but they are really easy to adapt - maybe try a scratch card holder?

For this lottery ticket holder I'm using Taken with Teal for the base, Really Rust and Old Olive card with Old Olive Satin ribbon .


I roughly measured my lottery ticket and cut my Taken with Teal card slightly bigger and scored it in the centre.

For example, if my ticket measured 3" x 5" then I would cut my card to 6 1/2" x 5 1/4" and score at 3 1/4" but it's probably easier to just eyeball it.


I cut down my Really Rust piece the same width as the holder (when closed) and about 2 1/2" high.

Place your ribbon in the centre of this piece and make small tick marks on either side of your ribbon towards the right hand side of the card.


I then took my craft knife and ruler to cut a small slit in between the tick marks.


Then slide your ribbon from the back to the front through the slit like shown below.


Wrap the rest of your ribbon around the closed holder and lay the Really Rust card onto the base to ensure you're happy with the position before sticking it down.


Once you've got your placement, apply adhesive to the back of the Really Rust piece but not over the ribbon.


It should then look like this (below) with your ribbon running in between the two layers -it should be free to slide without getting caught.


Line up the ends of your ribbon to the right hand side of your holder.

On the back, run a strip of adhesive where your ribbon will lie and stick it down.


Open up your holder and line up the ticket so there is an even border that runs around it.


Make small tick marks on the top and side as shown below.


Again using a craft knife and ruler, line up the two tick marks and make a diagonal cut. Do this to the top right and the bottom right hand corners.

You can then rub out your tick marks.


Slip the corner of the ticket into these slits and your ticket will hold in place.


Next I closed the holder and tied my ribbon so that I was happy with it.

I try to leave the 'tails' a little longer than normal so that when the recipient opens it, they can close it again afterwards.


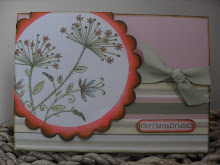
I only decided later to add a sentiment to the bottom part of the Really Rust card but using the Stamp-a-ma-jig made this really easy.


I just lined it up where I wanted the sentiment to go and stamped in Really Rust ink.


I used my A Rose is a Rose stamp set to stamp and cut out some images in coordinating inks.

For the rose I inked it up with Really Rust, stamped it first onto some scrap paper then onto some Whisper White card to get a weaker colour. Then I stamped the detailed image 'full strength' on top.

The leaves are done in the same way using Old Olive ink.


And it's really that easy, once you've made one you'll be away!

Now it's your turn to have a go! Do post a link in the comments so we can all see it too.

I really hope you've found this tutorial useful.

Thanks for stopping by,
take care.
x

Friday 16 July 2010

Card Class Gift

Hi everyone! It's finally Friday, woohooo!

My monthly classes are going really well and I'm so lucky to have such lovely customers which, in my opinion, makes the classes so much better.

So to thank them I always make a small thank you card to show my appreciation.
With my classes I give the option of just buying the class which includes all the materials but I also offer a 'package' which gives you a great saving when purchasing the stamp set used in that class at the same time.

And as another little thank you, when you purchase the set with the class you will receive a little surprise waiting for you on your desk! (See below)


If you're in the Liverpool area and fancy a lovely night crafting and chatting please do not hesitate to contact me, I'd love to see you there.

For more information you can visit the Craft Classes page in the top right hand corner or drop me an e-mail to:
craftychick001@yahoo.co.uk

Hope you have a lovely weekend, I'm off out tonight for our works 'Summer Party' which has a retro fairground theme with game stalls and everything! Hope to be able to share some photos with you soon.

Thanks for stopping by,
take care.
x

Wednesday 14 July 2010

Birdhouse Post it Note Holder

Hi everyone, I can't believe it's Wednesday already! These weeks are flying by.

I wanted to share with you a project I made following one of my fellow demo's Jo D. She is so very talented and her project are just fab so when I saw this on her blog I knew I just had to get it.

It uses the Sweet Treat Cups from the mini catalogue which I can't get enough of lately and the 2 Step Bird Punch.


The cup is filled with paper clips with a sliding door at the back for access! How cute!


Hope you're having a lovely week so far.

Thanks for stopping by,
take care.
x

Monday 12 July 2010

Everton Football Shirt

Hi everyone, Happy Monday!

Here is another football card I was asked to make for a friend in work - I love making these now!

I printed the badge onto some Whisper White card stock, I just love how well this prints.


On another note, we went to see Eclipse on Saturday... lots of screaming kids but it was still good!

I'm too excited for Breaking Dawn now, how long to wait?

And before I go I want to let you all in on my offer for July.

For every order over £50 placed with me before (and including) the 31st of July will entitle you to a free ink pad with your order!

If you are interested please let me know no later than 10:00pm on Saturday the 31st of July to qualify.

Thanks for stopping by,
take care.
x


Sunday 11 July 2010

A team challenge!

Hello everyone, hope your enjoying your weekend.

At the beginning of this week my lovely upline Bekka sent all of her team a mystery white envelope... inside had some card, ribbon lengths and a sheet of rub ons with a simple card inside to say details were in our newsletter!

I love surprises and she had the great idea to set us a challenge to use the stash in the envelope to create a card WITHOUT STAMPING!
I know, I was hyperventilating at the thought...

So I chose the Ruby Red card stock for my card base, then matted a piece of Chocolate Chip on top.


I applied the dotty border rub ons to the Chocolate Chip piece and tied some of the gorgeous Chocolate Chip satin ribbon around it.


Then I punched out a bunch of hearts using the Heart to Heart punch in Ruby Red, Chocolate Chip and Naturals Ivory card.

I popped some up with dimensionals and some stuck straight down with my tombow glue.

With the smaller Chocolate Chip hearts I felt they needed something else to make them stand out from the background so I used another border strip from the rub ons sheet.


This really kick started my mojo - esp. as I hadn't been expecting it.

I can't wait to see what the others come up with.

Thank you Bekka :)

Thanks for stopping by,
take care.
x

Friday 9 July 2010

Blue hearts.

Hi everyone. Happy Friday!

I'm so excited, my friend and I have booked our tickets to go see Eclipse tomorrow! We wanted to go last weekend for the midnight launch but we she was visiting family so couldn't make it.

I feel like such a big kid! Have you seen it/booked to see it?
Let me know what you think about it, I've read all the books anyway so know what happens :)

Right, moving onto something craft related. Here is a card I made with the intention of giving to Stu 'just because' although, he always makes a dig at me for making his anniversary and valentine cards 'too girlie' ! The cheek, maybe it's just him being 'too manly' haha and I think this is still not manly enough for him so I'll have to do another (any excuse to spend time crafting - Procraftination-itis! Anyone else got this? There's no cure, just medication in the form of stash to ease the symptoms!)

For the 'Designer Series Paper' element I used the little motif from Framed with Love and stamped it in a continuous pattern using the Stamp a ma jig (I was inspired by a card made by my lovely upline Bekka, you can see it here)


I used the I {Heart} Hearts stamp set and hand cut the bigger hearts but used the Heart to Heart punch for the smaller ones then finished it off with some Bashful Blue double stitched grosgrain ribbon. The love you sentiment is handwritten using my Signo White Gel pen along with the faux stitching.


Thanks for stopping by,
take care.
x

Wednesday 7 July 2010

Your a star!

I forgot I hadn't posted these!

As a Stampin' Up! demo we have a lot of support to help us run our business the way we want to, whether that be as a discount demo (who signs up purl for the discount on their own orders and maybe puts one or two through for a friend etc) or a career demo who builds a downline and gains incentive trips etc.

We have a service called Demo Support which is based in Germany.
The UK demo support staff are called Chris and Eileen.

They work so hard to help us with any queries or problems we may have.
On ILWS, Keren had the brilliant idea of doing a 'Demo Support Appreciation Day' where we all send a card to one or both of them to arrive on the same day (so hopefully they are inundated with cards!) - how I would have loved to be a fly on the wall when they all arrived!

I made the same card for both Chris and Eileen but changed the colours.

I used the star punch and our Schoolbook Sherif Alphabet stamp set for the letters then added some detail to the edges with the mat pack and piercing tool.


The day they arrived it just so happened my upline Bekka was on the phone to Chris and the poor little lamb is now worried what we all might have planned for convention *insert evil laugh - mwahhahaa!!* As last year was the first European convention (Chris especially) was practically mobbed!

I think it was such a lovely idea, a RAK (Random Act of Kindness) that I'm sure made their day!

Thanks for stopping by,
take care,
x

Tuesday 6 July 2010

Chelsea Football Shirt

Hello everyone, how's your week going so far?

The weather here is miserable so hopefully it's nicer where you are.

Here's another football shirt card I was asked to make.
(I can't seem to make them quick enough, everyone wants one!)


I printed out the badge and it fitted perfectly in our 1 3/8" circle punch.


And I've not forgotten about the Lottery ticket holder tutorial, I will do it tonight!

So make sure you come back tomorrow for it :)

Thanks for stopping by,
take care.
x

A very girlie card...

... these are my favourite to make simply because anything pink goes so I just use what I'd like to see on a card! Lol.

This is another commissioned card for a friend in work.

The letters are cut out using my digital die cutting machine and accented with some pink gems.

I used some Pretty in Pink taffeta ribbon and I just love the way this ties, it is definitely one of my must haves!


I punched out some coordinating paper with the butterfly punch and used some of Stampin' Up!'s silver elastic cord to tie around the middle to make their antenna, then slightly curled the top layer to make the wings 'flutter'.

I also used some of SU!'s card stock vellum in the die cut aperture which was then embossed to give some more detail.

So, girlie is my favourite type of card to make - what's yours?

Thanks for stopping by,
take care.
x

Monday 5 July 2010

Blackburn Rovers?

Hi everyone, happy Monday!

Here are the commissioned Blackburn Rovers cards I told you about a few posts back, please excuse the first photo - I thought I'd taken a proper one but turns out it was only on my iPhone so quality and lighting is not the best.

A friend in work asked me to make this for her son's 13th birthday.

Then she asked me to make one for her husband off the kids for fathers day.

They are surprisingly easy to make, the longest part on the first one was making the template to fit a c5 envelope but now that's done you can get straight to work - which is handy because another friend in work has asked me to make her Everton and Chelsea ones for her two sons which I will share soon.


It has been made using Stampin' Up! products; from the card base which is the 12" x 12" blank card 'backer' you get with the DSP to the marker pens and punches used with a stamp set for the badge.

The only non-SU! is the letters which I used my die cutting machine for.

It was really fun to make! I love paying attention to detail so this is not like work for me :)

Thanks for stopping by,
take care.
x


Saturday 3 July 2010

Happy Birthday Julie!!

Today is the lovely Julie's birthday, I met Julie at last years convention when we were roomies and we had such a laugh!

So Happy Birthday Julie!
Hope you have a lovely day


I used the Flight of the Butterfly stamp set with coordinating butterfly punch.

It was inspired by one of the cards in the current catalogue and changed the colours slightly.

Hope you like it Jules!

Thanks for stopping by,
take care.
x

Thursday 1 July 2010

Trendy Trees

Hi everyone!

We had a lot of fun at my card class on Tuesday, we had such a blast and once again thank you for you lovely feedback!

If your interested in attending one check out the details on the craft classes page :)

Here is another card with matching lottery ticket holder, I know there was a request on how I did the holder and plan to do a photo tutorial early next week so stay tuned!

I used the Trendy Trees stamp set for this one as well as the matching wheel called Funky Forest.


I used Mellow Moss taffeta ribbon as the closure and love this type of ribbon, it is quickly becoming one of my faves!

Thanks for stopping by,
take care.
x